Last Sunday's match between Benfica and FC Porto
has already been analysed in this blog, but now it is time for a more thorough breakdown of both teams' different aspects. Each team will have their own section, divided into attack and defence.
- Benfica started out by not pressing FC Porto goalkeeper. Benfica's two forwards, Cardozo and Lima, were instead instructed to keep an eye on FC Porto's centre-backs, with Enzo Pérez following the FC Porto midfielder that dropped back (usually Fernando).
- Benfica were also less pressing than usual, often choosing to drop back, allowing FC Porto more time on the ball than expected, especially during the first half.
- However, the team from Lisbon still found it hard to win back the loose balls from aerial duels, for instance. In this particular case, Jackson (yellow) is about to battle it out with Jardel. Due to the presence of Defour, Matic can't get as tight to João Moutinho (orange) as desirable. The Portuguese midfielder would end up getting the loose ball.


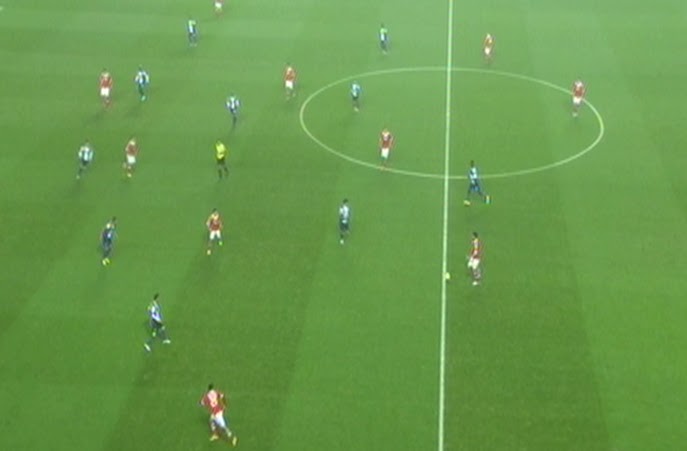
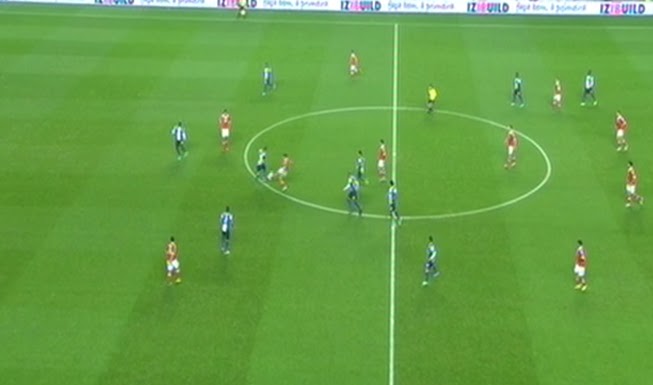
- The first picture shows how vulnerable Benfica were to penetrations down the centre. With neither Cardozo or Lima dropping back to help out in midfield, Fernando and FC Porto centre-backs - in this case, Mangala (yellow) - could often progress without any hassle. The yellow dotted line represents the simple pass towards Jackson Martínez that split Benfica's defence open (as seen in the second picture).
- As a result of FC Porto's pressing, namely for the first 60 minutes of the match, Benfica were forced to somewhat speculative long balls towards Cardozo. However, whenever the Eagles managed to keep the ball down, they often tended to look for their strength - the wings. While Gaitán insisted on drifting towards the centre, the right flank was where most of Benfica's attacking threats stemmed from. The first image depicts Benfica's typical attacking situation, with five players overloading the wing. The second one shows how Sálvio (blue) looks for Máxi (yellow) to stretch the play, while Cardozo (orange) takes the middle. The third picture shows another similar situation, where Lima (yellow) drags his marker out of position in order to allow Sálvio (orange) into the centre.
- The visitors were not afraid to defend high up and disturb Benfica's ability to play out from the back. The first two pictures are from the 5th minute and are displayed to exemplify the typical pressing exerted by FC Porto. Jackson Martínez would pay special attention to Benfica's right centre-back, whereas Lucho would be in charge of getting tight to the left centre-back (first picture) and/or the goalkeeper (second picture). The third picture is from FC Porto's second goal. While Artur has (correctly) been taking most of the blame, it is not less true that it only yielded results for the Dragons because the goalkeeper was under pressure. Notice how high up FC Porto are defending and how Jackson is close to Artur when he gets the ball at his feet.

- Whenever FC Porto were not able to stop their opponents' build-up play, the team would get more compact, trying to close down most passing options for Benfica. Here Garay brings the ball forward. but has no passing option available. He would end up misplacing his aerial pass.
- Unlike Benfica, FC Porto were very adamant at defending the centre, even though their rivals usually attack down the wings. In the first picture, Gaitán attempts to progress down the centre, meeting the opposition from all three FC Porto midfielders (red). Notice how Otamendi (yellow) is ready in case Gaitán managed to get by his markers (as he eventually did). The second picture shows Otamendi's good positioning and timing to frustrate the Argentinean's progression.
- With James Rodríguez absent, there was some curiosity regarding Defour's positioning and movement. Any lingering doubts that Defour would replicate the Colombian star's maneuvres as closely as possible all but disappeared on the first minute. The first picture shows Defour's central position (yellow) while the ball is on the left. The second one shows how a simple backpass from Varela to Fernando was the trigger for the Belgian's run behind Benfica's defence.
- With Defour's tendency to drift insde, FC Porto often resembled a 4x4x2 diamond, as seen on the pictures above, with Fernando further back, Moutinho to the left, Lucho González to the right and Defour behind Jackson Martínez, while the winger Varela offered the width on the left and the full-back Danilo did the same on the right.
- This particular picture shows the uneven contest between the two midfields, with Benfica's Matic and Enzo Pérez having to fight against Fernando (blue), Moutinho (yellow) and Lucho González (red) - which meant one of them was free most of the times. Notice how Cardozo and Lima do not get involved in the midfield battle.
- Fernando was indeed decisive in tipping the scale in FC Porto's favour as far as the midfield battle was concerned. In the first picture, you can see Enzo Pérez trying to press Fernando (yellow). All Lucho had to do was to make himself available for a pass, which he promptly did. In the second picture, Fernando (yellow) occupies both Benfica midfielders with Lucho free to pick his pass towards the right wing. In the third image, it is possible to see Danilo's freedom - all of this a mere two seconds after Enzo Pérez was trying to press Fernando.
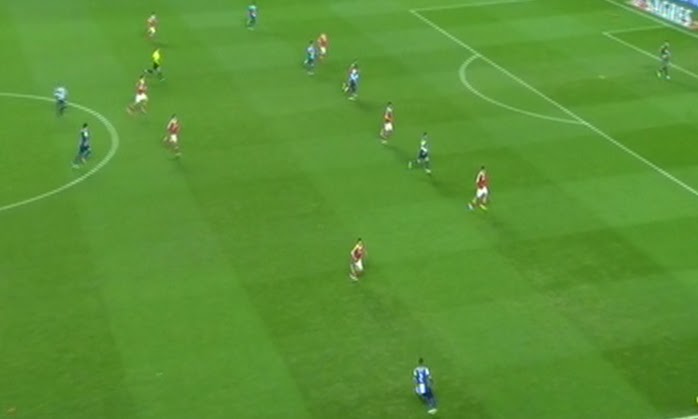
- Finally, the importance of Jackson Martínez (yellow) dropping back. His willingness to make himself available not only opened up an additional passing option, but it also dragged one centre-back with him, which meant FC Porto had space to exploit behind said centre-back. Notice how Lucho González has got past Benfica's midfield, almost level with his team-mate.


No comments:
Post a Comment